

What Nd Filter On Beach
Long Exposure Beach Photography: The Complete Guide
Everyone loves a great embankment trip, and the same goes for photographers. This type of nature photography presents endless opportunities for middle-catching images.
With the beach'south timeless waves, ethereal coastline, and impressive skies, you lot'll find plenty of elements to explore by the sea.
Long exposure photography, in detail, tin create stunning beach shots. Here, we'll explore the basics of long exposure photography, along with how it tin can be implemented in coastal shots. Let's dive in!
What is Long Exposure Photography?
Long exposure is a photographic technique that uses a long shutter speed to achieve a specific visual consequence.
For instance, a long exposure may be used to create soft textures in an paradigm. Or it may be used to capture the progression of time, displaying events in a way that we can't oft see with our eyes alone.
Specific shutter speed doesn't define long exposure photography. The exposure must exist slow plenty to create a distinct outcome.
When to Use Long Exposure Photography
The Gilded Hr
The Golden Hour occurs at sunrise and sunset. During this time, the lord's day is positioned far downward on the horizon. So, the rays of sunlight travel outward at a flatter bending. This creates soft, diffused light with golden highlights.
While shooting during the Golden Hour, pay special attending to subjects that wait especially striking when illuminated by the golden light.
Call up most body of water shorelines, shallow pools of water, and beach pebbles. These objects are stunning at this time of day.
If you plan to shoot at the Golden Hour, I recommend you arrive at least an 60 minutes early. Arriving early will allow yous to become set up and ready before the lite starts shifting into vibrant colors. This manner yous reduce the chance of missing out on the perfect moment for your shot.
The Blue Hour
The Blue Hour occurs earlier sunrise and afterwards sunset.
My best advice for sunset embankment photography is to never get out your location until the blue 60 minutes is over. If y'all get out the location as soon as the sun sets on the horizon, you'll miss out on some of the all-time, virtually interesting lighting for photography.
While the lord's day may not be visible, it may still illuminate the heaven with a gentle warm glow at the horizon. The glimmers of soft colors left by the sun, combined with the cool bright blueish of the early dark heaven can create some of the best backdrops for nature photography.
Overcast, Rainy, and Stormy Days
When the atmospheric condition is temperamental, get to the beach with your photographic camera.
A stormy sky makes for a dramatic composition. This tin can be true, even if you become out to shoot in the heart of the twenty-four hour period.
I particularly love going to the embankment on overcast days to shoot in black and white. With a 10-stop ND filter, you tin can create mysterious, moody photographs. Some of my favorite beach images were taken under these conditions.
Plus, beaches are commonly empty when the conditions is poor and so you lot'll accept the whole place to yourself. You wouldn't have to worry near fugitive people when composing your images.
Settings
Shutter Speed
There's no set up shutter speed to utilise in long exposure embankment photography.
The right shutter speed to utilize is dependent on several variables such every bit the quality of lighting, water'southward movements, and the aesthetic you're trying to achieve.
Depending on the speed of moving water, I typically use a shutter speed of ¼ to 2 seconds when doing coastal photography.
For a residuum of softness and detail with a long exposure, I utilize a ¼ shutter speed. This value allows your photographic camera to catch the waves' full general construction but gives the image a soft quality.
With exposures longer than ¼ of a second, yous'll typically wouldn't be able to capture the clear grade of the moving ridge. I ordinarily use these shutter speeds if I want to create h2o effects that accept a smooth and silky quality to information technology.
That said, remember to try out a multifariousness of shutter speeds. You'll demand to experiment to figure out which choice creates the visual effect that you're going for.
ISO and Aperture
For beach photography, a narrow aperture is typically ideal. This allows you to create a deep depth of field, keeping both your foreground and background in focus.
Typically I utilize Aperture priority along with a airtight down discontinuity of nigh f/9-f/14. Sometimes, if it's not besides vivid, I'll skip the ND filter and control brightness using narrower apertures, around f/xiv-f/16.
That said, in most cases, yous typically can't accomplish long exposure with a closed discontinuity alone. You lot'll demand to apply an ND filter to achieve the effect that you're going for.
For ISO, I suggest using the lowest possible for your camera. This is not just helpful in preventing noisy images, but it will also allow you to play with long exposures without worrying well-nigh overexposure.
Gear
Broad Bending Lens
A broad-angle lens is oftentimes my choice of lens for embankment photography. You can successfully use other lenses, but a wide-angle lens will capture a greater scope of your scene.
Wide-bending lenses are also great for emphasizing depth in your photograph, creating the illusion of your foreground being closer and the horizon being far away.
These lenses are also known for their broad depth of field, making them ideal for beach photography where yous'll often desire to capture almost of your image in precipitous focus.
ND Filters
For long exposure photography, an ND filter is an essential tool. ND filters reduce the amount of light that reaches the camera's sensor.
They allow you to apply longer exposure times without overexposing your images.
When taking long exposure photos at the beach, ND filters can give water a smooth, silky outcome. Depending on your exposure fourth dimension, you can manipulate how your h2o volition appear: soft and silky or smoky and mysterious. Without an ND filter, achieving this issue is nearly impossible without overexposing your prototype.
ND filters vary in strength with the virtually commonly used filters beingness 2-stop, six-stop, and 10-finish. The higher the finish of ND filter, the more than light it will prevent from reaching the sensor.
For example, a 2-terminate ND filter will reduce exposure by 2 stops. That is, to achieve the same level of exposure, you demand to increment your other exposure settings by two stops.
ND filters follow multiple notational processes. The most common and easiest to sympathise is the "ND#" method. Using this note a 1-stop ND filter is notated equally ND2. It is referred to every bit ND2 because a multiplication factor of two is applied to the number of stops information technology reduces.
For example, a two-stop ND filter is notated as ND4, and a three-stop ND filter is notated ND6. This makes information technology quite easy to keep runway of the number of stops of calorie-free you are reducing.
I typically employ three ND filters when I go out to shoot: iii-end, six-stop, and ten-stop.
I use a 3-end filter when I am using shutter speeds between 1/250 of a 2d and ½ second for giving waves a silky smooth appearance. When I am using shutter speeds longer than 1 second or on sunny days, I typically opt for a half-dozen-end ND filter. It gives your images a more than mysterious and moody feel.
Ten-stop filters work cracking if y'all are trying to shoot long exposure during the day. This filter allows the apply of very long exposure times, creating a much more mysterious and moody feel.
One of the all-time features of ND filters is that they are stackable, which ways that you tin stack several ND filters together to heighten the issue.
Suppose y'all need a ten-stop filter, just you merely take a iv-stop and six-stop filter. To overcome this issue, you can place both of the filters on your camera to attain the same effect every bit a ten-end filter.
You lot can likewise utilise a special type of ND filter, a graduated ND filter. A graduated ND filter reduces light in a gradation. In nigh cases, the tiptop portion of the filter is darker and applies more light reduction than the lesser half.
It's common to apply graduated ND filters during sunrise or sunset to correct for the stark differences in the brightness between the sky and the foreground. A graduated ND filter will help ensure that you lot don't can properly betrayal your sky and background.
CPL (Circular Polarized) Filter
Another filter that can be useful during the long exposure beach photography is a Circular Polarized Filter. Y'all can utilize a CPL filter to remove reflections from water, heighten color, and reduce the shininess bandage by bright calorie-free.
As well, be cautious when selecting the strength of your CPL filter. Similar to an ND filter, information technology reduces the amount of light reaching the camera'due south sensor, typically around ane-2 stop reduction. Using a CPL filter that is too powerful can requite an undesirable appearance to your images.
Tripod
A tripod is a fundamental tool for all long exposure photography. It helps prevent camera shake and blurry images when shooting with slow shutter speeds.
For beach photography, I highly suggest that you bring a stable, durable tripod.
Winds are often loftier at the beach, making lightweight tripods likely to milk shake and sway. A flimsy tripod may fifty-fifty flip over when the tide comes in.
If y'all don't want to bear a heavy tripod, consider bringing one that provides a hook y'all can use to add together weight and stability to your tripod.
With these hooks, you tin merely apply your camera handbag for added weight. Most photographers store enough gear in their camera pocketbook to add an extra five to ten pounds to the tripod.
Finally, I recommend using a tripod that can be broken down into parts. Sand can make it the small crevices of your tripod, and being able to take it apart is the most convenient pick for cleaning. If your tripod tin can't be taken apart, it may very well become irreversibly packed with sand after a embankment shoot.
Always remember to clean your tripod when you become home from a beach shoot. Saltwater and droppings are bound to go all over information technology, so you'll need to clean it promptly.
Tripod Spikes
As I mentioned to a higher place, the wind and motion of waves at the beach can cause your tripod to exist unstable. This volition, if the issue isn't addressed, crusade blurred, unclear photos.
To gear up this issue, I find using tripod spikes to be an effective solution. The spiked feet let yous to wedge the tripod into the sand to proceed the tripod secure.
If you have tripod spikes, you can keep your camera on the tripod even if you walk away while the tide is coming in. Tripod spikes are underrated. But, they're a crucial tool for camera stability when y'all're shooting at the embankment.
Lens Fabric
A lens fabric is an essential tool to have whenever yous're shooting outdoors. Specially when y'all're switching between warm and cold temperatures, the camera lens can become clouded and ruin your shot.
At the beach, splashes of h2o tin become on your lens or filters and obscure your shot. Bringing along a plain lens fabric will enable yous to fix these problems by just wiping your lens and filters clean.
Remote Shutter Release
If yous program to use exposure times longer than 30 seconds, then a cable release is a must-have.
By thirty seconds, your camera volition turn to Bulb mode. This means that your camera will keep the shutter open up until you physically remove your finger from the shutter push. Most people find this impossible to do without a cable release.
If you don't own one nonetheless and are planning to buy i, I'd recommend a mid-range priced cable release.
In my years every bit a photographer, I've seen inexpensive, knock-off make cable releases that don't even make it through i employ. But, on the flip side, I've as well seen advanced intervalometers lose battery power on location and become completely worthless.
Find a balance between these two prices while focusing on durability and functionality.
Techniques
Foggy H2o Upshot
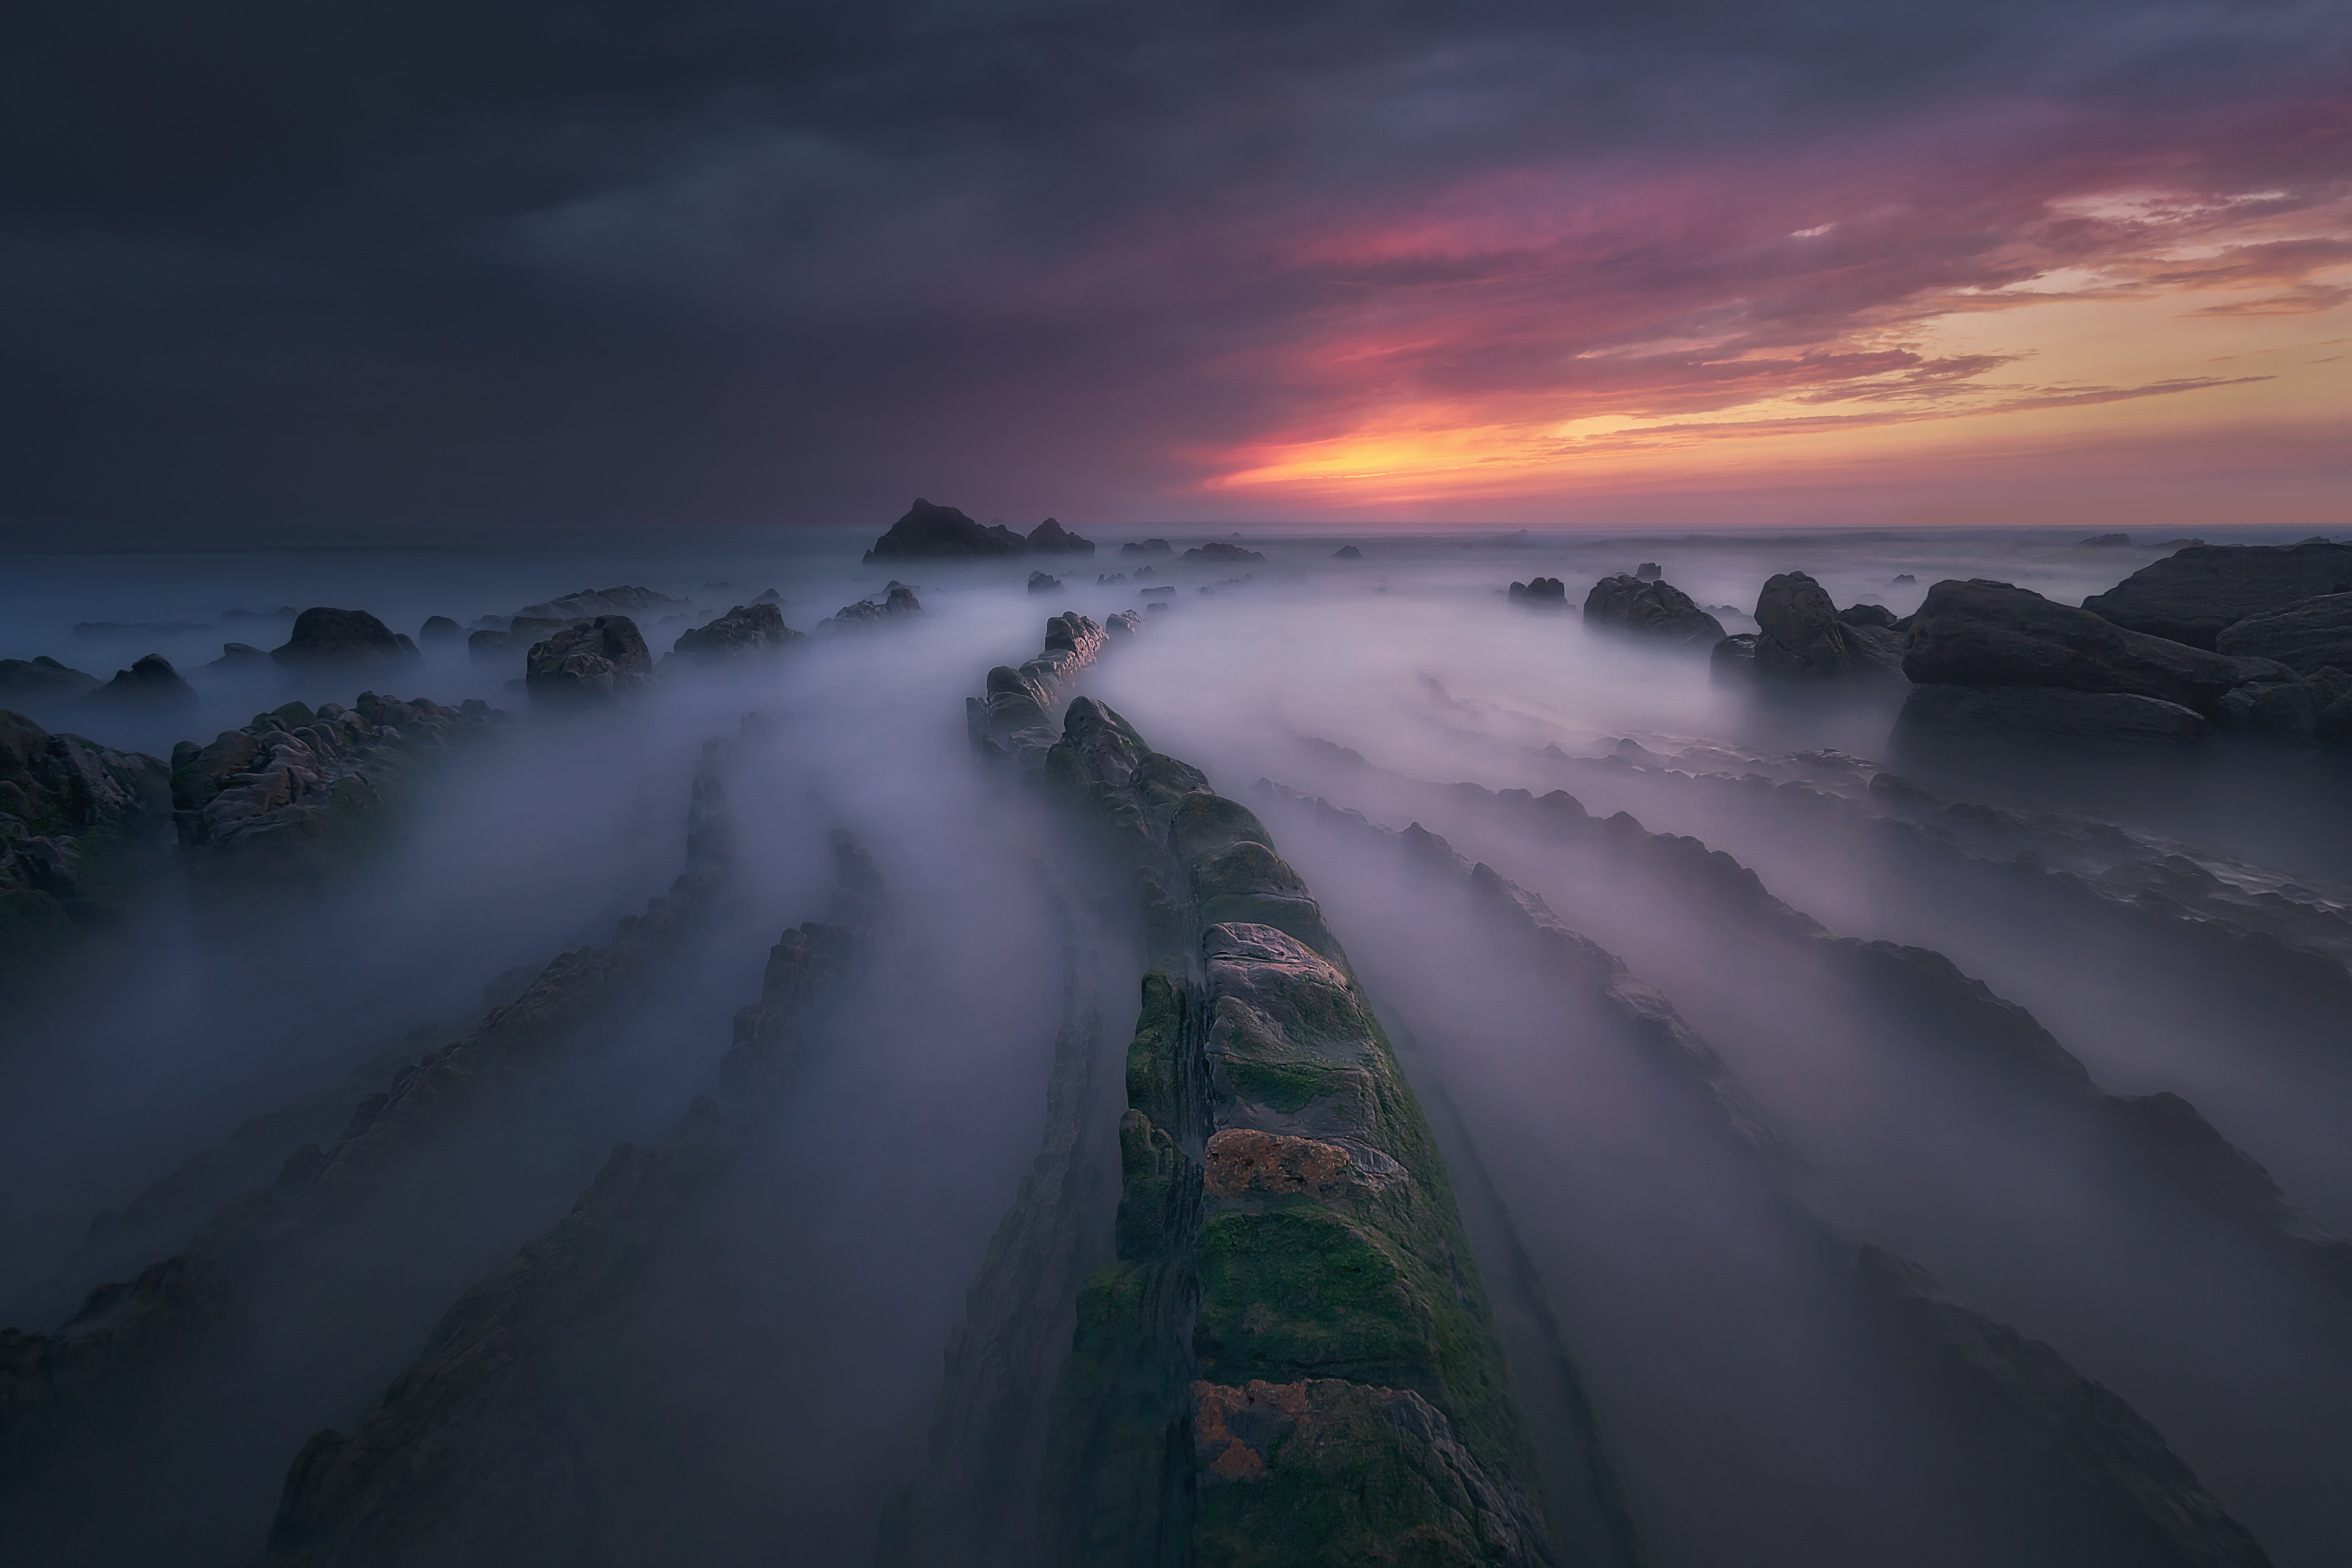
One way you do coastal long exposure photography is to capture the water's motility in the form of a fog.
To create this foggy effect, y'all take to have waves. A even so, calm ocean volition appear as a directly line with a long exposure.
You'll also demand to employ an extended exposure of around 10-xx seconds.
When you leave the shutter open up for this long, you allow your camera's sensor to record a culmination of different moving ridge movements in a single paradigm. The result is a soft, foggy visual effect.
This blazon of long exposure also gives the clouds a glossy texture. This makes for a fantasy-like advent, specially when used as a backdrop to moving water.
The low-light during the blueish hour makes it an ideal fourth dimension to shoot this type of issue. You may besides employ an ND filter to capture long exposure photos in brighter conditions.
When you're aiming for this effect, try to include a solid object in the image. Doing then volition provide your composition with an anchor for contrast.
Yous can accentuate the foggy look by incorporating still objects, like pebble stones or a lighthouse. The fog will float effectually these objects, accentuating the feeling of time passing.
Consider using a zoom lens for this type of shot, likewise – I find that information technology will produce the best effect.
H2o Trails

There'due south no specific shutter speed that you lot accept to utilize to create this upshot. Since yous tin can never predict the speed at which waves move, you'll need to experiment with what shutter speed works best.
I'd recommend starting at ½ of a 2nd for this effect. Only yous may need to go equally slow as ii seconds for slower waves.
It'southward critical to note that you must be standing in the water to create this type of shot. Dress accordingly and be prepared to get wet.
Bring spike anxiety and wedge your tripod into the sand, until the spikes are fully submerged nether the footing. This will help prevent the tripod from moving as the water comes in and out.
Recollect, it'southward crucial to capture the water equally it recedes, non as it's coming in. Be patient and wait until a moving ridge comes it and push button your shutter speed equally it recedes into the ocean.
Abstract, Long Exposure Beach Photography

For about abstract coastal photography, the goal is to photograph the motion of the waves without blurring them completely. The course and color of the waves should be axiomatic.
For these types of limerick, y'all want to use a zoom lens. You'll also want the waves to be average in size on the solar day that you choose to shoot.
In terms of shutter speed, experimentation is central. I suggest starting with a ½ 2d shutter speed, then making changes as you demand to.
You may fail several times earlier yous accomplish the shot that y'all're going for. So you'll need to be patient.
When y'all become to shoot, recognize the tones and lines of the waves. You may or may not include the sky, depending on what information technology will contribute to your shot
Daytime Long Exposure Photography

Most images created during the 24-hour interval are shot with brusque exposure. This is unsurprising, considering the vivid ambience light during this time.
But, with the proper tools, you lot tin can create wholly unique images with long exposures during the twenty-four hour period.
Depending on your terminal goal, the exposure length that you lot need will vary.
For the surreal appearance of fog in the h2o, your shutter speed can vary from 20 seconds to i minute or longer. This will be dependent on the quality of lite available. An overcast day will require yous to use longer shutter speeds than a bright cloudless day.
The same principle goes for cloud streaks. Although your shutter speed for creating this effect volition also heavily depend on how fast the clouds are moving. Slower clouds will require you to apply longer shutter speeds than faster clouds.
To a higher place all, you'll need a dark ND filter with a minimum of 6 stops. This is i piece of equipment that you can't glaze over – it's crucial for long exposure shots in daylight.
Ideally, you'll need a nine or x-stop ND filter. Only with a strong ND filter volition you e able to accept an exposure longer than 30 seconds during the twenty-four hours.
The ND filter that you lot pick should enable you to apply a one to 5-minute exposure during the 24-hour interval. The ND filter you need will depend on the intensity of light but consider a ten-stop ND filter and greater.
An ND filter that lacks in strength but won't do the pull a fast one on – daylight requires this tool to achieve long exposure shots.
A Few Things Yous Demand to Consider with Mean solar day Time Photography:
When you use an ND filter with over six stops, a magenta hue will be visible in color images.
This phenomenon happens because while ND filters cut out light that tin exist seen in the visible spectrum, infrared lite still comes through.
The magenta cast isn't widely liked past photographers. Unfortunately, it'due south tricky to remove information technology in postal service-processing. If this is an result for you lot, consider converting your image to black and white.
Vignetting is another issue that you lot may run into. Vignetting is when the corners of a photograph darken, and it happens when the ND filter blocks out light from the scene.
Filters with a thick mount are more than likely to create this effect. Vignetting is also more mutual when you "stack" filters.
If this is an result for you, you can try minimizing the vignette in post-processing, or you tin crop out the corners of your image.
Composition Tips
Timing
When you lot're working with moving waves, timing is everything. Waves move back and forth, rising and receding over and over once more.
Perfecting your timing may take some time and practice, so you'll need to be patient.
Some photographers like to use the burst/continuous mode on their cameras when photographing waves. This enables you to shoot continuously and see what you get at the cease.
What I plant, notwithstanding, is this method also leads to a huge book of not-quality shots after the shoot, since there is not a high caste of accuracy in timing. So, I would highly recommend manually decision-making the shutter push button.
The all-time time to press the shutter is when the waves recede – not when the waves are coming in. White foam appears when the waves recede, which makes for lovely leading lines in an epitome.
That said, there are times when pressing the shutter equally the waves come in can work as well. For case, this may work if you want to prove water hitting the rocks and create a striking await of splashes.
Some other recommended strategy is using a remote cable release. Although it'due south certainly not mandatory, having one can assistance minimize accidental camera shake that can result in blurry images.
For shutter speed, I commonly work with ½ of a 2d to 2 seconds, but brand adjustments depending on how the waves carry that day. Beach photography is all about exploration and trying new things, so keep your mind open.
Level the Horizon
Brand sure your camera is leveled when composing your shot. Although an off-level horizon can be stock-still in post-processing, this isn't ever platonic.
If yous gear up the leveling while editing, you'll need to trim the edges in your frame. If there are key visual elements at the edges of the images, y'all may run into problems while cropping.
One of the easiest ways to level your horizon is to utilize a tripod. This is particularly true if your tripod head has a born bubble level.
Using a tripod volition allow you to make small adjustments to your camera until its perfectly level with the horizon.
Whether y'all are using a tripod or non, the following tools will assist yous level your horizon.
To keep images from coming out slanted, you can besides turn on your camera'south gridlines. Most cameras give you the option to display a 3×3 filigree on your live view screen.
To utilize the gridlines, select the menu button on your camera and gyre until yous find the "filigree display." When you choose "grid display," y'all volition be prompted with ane of two screens.
If your camera simply has one grid setting, yous will be prompt with "yes" or "no." Select yes to actuate the grid view on your cameras.
The standard for most cameras with only one option is a 3×3 gird.
On the other hand, if your camera has mulitple gird options, yous will need to select from a list. Well-nigh cameras provide a small image of what the filigree looks similar next to the setting. Select a filigree option with horizontal lines so yous tin can level your horizon.
I recommend using a three×iii or six×4 grid. These will come up with enough horizontal lines to requite compositional flexibility.
Another option for leveling your horizon is using the cameras built-in level. Most but non all, DSLR cameras take a built-in level that you can actuate in the bill of fare. Some cameras also permit you to brandish the level on your live view.
This can be extremely useful when composing an image but can be a bit disruptive if yous are still composing your image.I recommend activating the built-in level one time you have composed your image.
If y'all want to go along your live view clean and strictly for composing your images, you tin can use a bubble level to make sure your horizon is level. In most cases, the bubble level connects to the hot plate on your photographic camera. Information technology functions exactly like a traditional carpentry chimera level. In that location is an air chimera suspended in liquid, and when the photographic camera is leveled, the air bubble will fall to the center.
Vertical Format

It'southward easy to forget nearly turning your photographic camera vertically when shooting landscapes.
Looking side to side instead of up and down is far more intuitive and natural to us. Plus, cameras are built to cater to the landscape orientation more than portrait orientation.
This is especially true for cameras that are large and heavy. These types of cameras are tricky to rotate to a vertical format and trickier to stabilize in that position.
Equally a result, most photographers intuitively opt for a landscape format.
While this is the all-time option in many circumstances, in that location are times when vertical format could provide more benefits for an image.
This is particularly true for images that accept plenty of tall, vertical elements. In such cases, portrait orientation can add depth to an prototype, leading your viewer'south eyes to travel upwards and downwards.
This every bit opposed to looking from side to side, which is the tendency with horizontal formats.
Using vertical orientation is a swell manner to highlight the pinnacle of the palm trees in your beach photograph. It is likewise a great choice in cases where yous're using the shoreline equally a way to atomic number 82 the viewers through your prototype.
Then, take the run a risk and endeavor vertical format when you're out on a shoot. Y'all may struggle a bit to stabilize your camera, but the work will be well worth it when you end up with an original shot.
Focal Point
Just every bit in other types of photography, you need to thoughtfully select a focal point in beach photography.
An image with a focal signal will engage viewers, while an image without i volition confuse them.
Proceed an eye out for palm trees, sandcastles, rocks and other elements you lot can use equally your focal bespeak.
You can also use wild animals as your focal signal. You'll exist surprised at the number of creatures you'll notice on the beach. From seagulls to starfish, littoral wildlife provides a dandy variety of options for your focal indicate,
Some other popular examples for focal point include boardwalks, lighthouses, shadows, and silhouettes.
Foreground
Adding a foreground element in your composition is a great way to add visual interest to your coastal image. Since the visual of a embankment is constantly changing, your foreground tin contain any number of variable elements.
For case, sandy beaches often have large rocks upon which the waves crash. The rocks tin can be a solid aspect in your foreground, providing contrast to the fluid water.
I of my favorite elements to add to the foreground are round pebbles in the sea-soaked sand. These pebbles create interesting patterns that serve every bit an outline of the receding sea.
Other small bodies of water, such as streams and pools, also make excellent foreground objects. These smaller bodies of h2o create a striking perspective for the overwhelming sea farther back in the paradigm.
When you're scoping out a location, consider the foreground one of your priorities. Explore the area and run across what interesting elements you can find.
Practice Minimalism
In photography, nosotros're challenged to create by taking away visual elements instead of adding them. This is in contrast to other fine art forms, namely drawing or painting, in which the artist must add to a blank canvas.
A well-defined composition will accept fewer visual factors to pull the viewer's attention away from your key subject. This may exist difficult to do when working on sweeping scenery, such as beach photography.
Only, an image with too many details is rarely constructive. Minimalism in photography is virtually honing in on what's crucial to the overall message of the paradigm. It's your decision as to what's important and what's not. You have consummate control over the direction and perspective of the photograph.
Before you hitting the shutter button, determine on the element that is most important in your image. Then, organize the composition and then that the chemical element is the most visible.
Check your work in the viewfinder and make sure that you lot have a focused, clear shot. If something is distracting, eliminate information technology.
Focus on simplicity and clarity in your limerick. Consider the big motion-picture show rather than the minuscule elements, and brand certain that every subject yous include plays a valuable function.
Double-Bank check
It's extremely tricky (and takes a caste of luck) to have all of the about enrapturing waveforms in simply one shot.
So, one of my favorite methods in coastal photography is to alloy several images with varying waveforms.
In particular, I take the top waves from three dissever shots and combine them using editing software.
To try this technique, be sure to keep your tripod in the exact same place until you lot have all the shots you need.
In one case you have all of the shots that you want to use for a blended shot, yous can move the tripod. Doing this will make the post-processing piece of work that you lot have to do later on much easier.
Besides, besides waves, ensure that you lot've captured all of the elements that yous want in the composition prior to repositioning the tripod.
For instance, if you desire a sunburst in the blended image, take a shot that's exposed for the sunlight before moving on.
Have Fun, Merely Take Care
Ever come up prepared when doing beach photography. Wear waterproof gear, namely waterproof shoes and pants, if you're planning on standing in the water.
The sea can exist turbulent, and beaches tin can exist infamous for crude, unpredictable waves. So, always be diligent and pay attention to what comes your fashion.
Conclusion
Seaside shoots produce incredibly interesting, beautiful photographs.
The ocean is expansive and mysterious, unpredictable and timeless. It'southward no wonder the photographers flock to the seaside with their cameras, aiming to capture the beauty of the waves.
In this commodity, nosotros've covered how you lot can utilise long exposure photography to shoot striking, unique visuals.
At that place is a plethora of potential subject area matter bachelor to you by the body of water. So, prepare yourself for the body of water's enchanting waves and caput out to create your ain stunning coastal images.
Additional Resources
The Ultimate Guide To Embankment Photography

What Nd Filter On Beach,
Source: https://pixelsandwanderlust.com/long-exposure-beach-photography/
Posted by: halseydenerivery99.blogspot.com
0 Response to "What Nd Filter On Beach"
Post a Comment